carr3r

Do Javascript functions pass parameters by reference or value?

Well, I read a lot of stuff regarding this topic and I saw people being very controversial about it. Before reaching my clearer conviction about whether it's by reference or value, I was minded to accept the following statements:

"Primitive type variables like strings and numbers are always passed by value.
Arrays and Objects are passed by reference or by value based on these conditions:

  • if you are setting the value of an object or array it is Pass by Value.

object1 = {prop: 'car'};
array1 = [1,2,3];

  • if you are changing a property value of an object or array then it is Pass by Reference.

object1.prop = 'car';
array1[0] = 9;"

Although these statements do reflect how JS functions seem to handle parameters, I wasn't really convinced with it. But then I saw this post, with nice pretty drawings, and I came to understand that variables are POINTERS to something (whether it's an object, array, primitive type, whatever). This is, actually, the key point for this matter (since parameters are nothing more than variables declared within the context/scope of a function). Let's use illustrations to visualize how JS handles variables assignments (let's not worry about scopes so we can focus on one thing only).

Consider the instruction:

var motorcycle = "Honda Shadow";

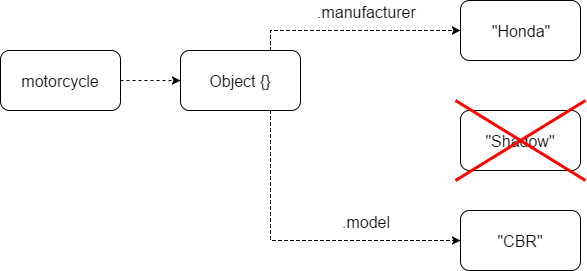
When I assign something to my motorcycle-named variable, JS makes that variable point toward it (an immutable string "Honda Shadow").

When we re-assign something to the motorcycle variable, JS simply makes that variable point toward our new thing (in this case, an object). "Honda Shadow" string will be picked up and taken care of by the JS Garbage Collector. 

motorcycle = {
	manufacturer: "Honda",
	model: "Shadow"
}


And the same would happen to the properties of my object, because objects are just variables containing variables:

motorcycle.model = "CBR";


Only to reinforce, if we assign a new object to it:

motorcycle = {
	manufacturer: "Yamaha",
	model: "R1"
};


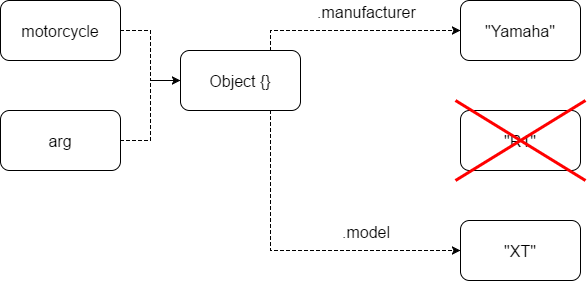
Okay, now, what happens when we pass the variable motorcycle as a parameter in a function? Well, now we have two variables (one declared in the global scope, motorcycle, and the other declared within the function scope), pointing towards the same thing (our Yamaha R1).

var motorcycle = {
	manufacturer: "Yamaha",
	model: "R1"
}

function whatever(arg)
{
	//arg equals {manufacturer: "Yamaha", model: "R1"}
}

whatever(motorcycle);


If we change the object's model property within the function, we end up affecting "both" objects since they reference the same thing. 

var motorcycle = {
	manufacturer: "Yamaha",
	model: "R1"
}

function whatever(arg)
{
	arg.model = "XT";
}

whatever(motorcycle);
//motorcycle equals {manufacturer: "Yamaha", model: "XT"}


Now comes the break-through part! If we assign a new object to the arg variable within the function scope, we'll make it point towards another thing, as we've seen several time above, but that doesn't change the fact that the outer (or global) variable motorcycle is still pointing to the old thing!

var motorcycle = {
	manufacturer: "Yamaha",
	model: "XT"
}

function whatever(arg)
{
	arg = {
		manufacturer: "Kawasaki",
		model: "Ninja"
	};
}

whatever(motorcycle);
//motorcycle equals {manufacturer: "Yamaha", model: "R1"}


Capiche?

Check out this live demo.

Method overloading and overriding in PHP

I recently got asked (in an interview) if PHP supports method overloading and overriding. Without properly processing the question, I luckily gave a doubtful "yes" for an answer. The interviewer,  thank goodness, didn't require further details. At that moment, it wasn't really clear to me how PHP accomplishes these two forms of polymorphism. Be careful: in PHP, they are tricky!, specially Method overloading.

Let's remind what method overloading & overriding are (and let's use Java for comparison): 

  • Method overloading is when you define the same method name twice (or more), within the same class, using different set of parameters.
    public class Calculator
    {
    	protected double memory = 0;
    	
    	public void Add(int number)
    	{
    		memory += number;
    	}
    
    	public void Add(double number)
    	{
    		memory += number;
    	}
    
    	public void Add(int number1, int number2)
    	{
    		memory += number1 + number2;
    	}
    
    }
  • Method overriding is when you extend a class and rewrite a method (with the same set of parameters) defined in the parent class.
    public class CalculatorPercentage extends Calculator {
    
    	public void Add(int number)
    	{
    		memory += (memory*number/100);
    	}
    
    	public void Add(double number)
    	{
    		memory += (memory*number/100);
    	}
    
    	public void Add(int number1, int number2)
    	{
    		memory += (memory*number1/100) + (memory*number2/100);
    	}
    
    }

Now let's try to translate the Calculator class to PHP, in a very very naive way.

class Calculator
{
	protected $memory = 0;
	
	public function Add(int $number)
	{
		$this->memory += $number;
	}

	public function Add(double $number)
	{
		$this->memory += $number;
	}

	public function Add(int $number1, int $number2)
	{
		$this->memory += $number1 + $number2;
	}

}

If we try to run it, PHP will throw a fatal error:

PHP Fatal error: Cannot redeclare Calculator::Add()

That's because PHP actually doesn't fully support method overriding but it provides you two ways of achieving it: using Magic Methods and Variable-length argument lists

Magic method

__call(string $name , array $arguments) is a magic function that will be called whenever you request a method that hasn't been declared within your class (neither within its parents). Also, Type Hinting doesn't work with scalar types in PHP5.

Adjusting our previous naive-attempt code, we would have:

class Calculator
{
	protected $memory = 0;
	
	public function __call($method_name, $parameters)
	{
		if ($method_name == "Add")
		{
			switch (sizeof($parameters))
			{
				case 1:
					$this->memory += $parameters[0];
				break;
				case 2:
					$this->memory += $parameters[0] + $parameters[1];
				break;
			}
		}
	}
}

... and its child class CalculatorPercentage:

class CalculatorPercentage extends Calculator
{
    	public function __call($method_name, $parameters)
	{
        	if ($method_name == "Add")
	        {
        	    switch (sizeof($parameters))
	            {
        	        case 1:
                	    $this->memory += ( $this->memory * $parameters[0] / 100 );
	                break;
        	        case 2:
                	    $this->memory += ( $this->memory * $parameters[0] / 100 ) + ( $this->memory * $parameters[1] / 100 );
	                break;
	            }
        	}
	}    
}

Variable-length argument lists

In PHP versions lower than 5.5, we can completely omit the parameters signature part in the method declaration and still recover that information using func_num_args() and  func_get_args() within its body to decide which behavior the method should take to a given set of parameters. 

For instance,

function example()
{
	echo "You've called me passing ". func_num_args()." arguments.\n";
	if ( func_num_args() )
		print_r( func_get_args() );
}

example();
example('Hello world');
example(array('1',2), '3', new stdClass());

would output:

You've called me passing 0 arguments.
You've called me passing 1 arguments.
Array
(
    [0] => Hello world
)
You've called me passing 3 arguments.
Array
(
    [0] => Array
        (
            [0] => 1
            [1] => 2
        )

    [1] => 3
    [2] => stdClass Object
        (
        )

)

In PHP versions greater than 5.6, we can use ... on the method's signature to indicate that method will receive a variable-length list of parameters. Making use of this resource, our Calculator class can be written as follows:

class Calculator
{
	protected $memory = 0;
	
	public function Add(...$parameters)
	{
		foreach($parameters as $number)
			$this->memory += $number;
	}
}

Compiling our library project on Linux

Going further on my research about creating a Windows 64bit library, I wondered how I could bring it into a Linux environment. I knew some modifications would be required (since there's no "windows" library on Linux, for instance, and there's no need for the DllMain function to exist) but I wanted to know what exactly should change.

First of all, going a little bit deeper on the libraries' subject, there's something that is worth mentioning. As Wikipedia states, "a library is a collection of implementations of behavior, written in terms of a language, that has a well-defined interface by which the behavior is invoked". There're two types of libraries: static and dynamic ones. Static libraries (*.lib in Windows/*.a in Linux) are "merged"/copied into a target application and becomes part of it. Dynamic libraries (*.dll in Windows/*.so in Linux) don't. They can be dynamically loaded/unloaded, shared and versioned (there is an interesting discussion about pros 'n cons here). A program that makes use a dynamic library can achieve that by being linked to one or more libraries at compile time (and all the linking work is done by a dynamic linker) or can dynamically load/unload this library at run-time (and everything has to be done "manually", as we did to use our DLL in Windows).

Coming back to our original code, following the suggestion found here, we can adjust our code by segregating OS' specific codes, identifying the compiler being used in compile time.

/* dll.h */
#ifndef __DLL_H__
#define __DLL_H__

#if defined(_MSC_VER) // Microsoft 
   #define DLL_EXPORT __declspec(dllexport)
   #define DLL_IMPORT __declspec(dllimport)
#elif defined(_GCC)   // GCC
   #define DLL_EXPORT __attribute__((visibility("default")))
   #define DLL_IMPORT
#else                 // do nothing and hope for the best?
   #define DLL_EXPORT
   #define DLL_IMPORT
   #pragma warning Unknown dynamic link import/export semantics.
#endif

char * DLL_EXPORT hello(char * user); // returns a string "Hello USER!";
void DLL_EXPORT helloworld(); //prints out a "Hello World"

#endif // __DLL_H__


/* dllmain.c */
#include "dll.h"
#include <stdio.h>

#if defined(_MSC_VER)

   #include <windows.h>
   BOOL WINAPI DllMain(HINSTANCE hinstDLL,DWORD fdwReason,LPVOID lpvReserved)
   {
      switch(fdwReason)
      {
         case DLL_PROCESS_ATTACH:
         {
            break;
         }
         case DLL_PROCESS_DETACH:
         {
            break;
         }
         case DLL_THREAD_ATTACH:
         {
            break;
         }
         case DLL_THREAD_DETACH:
         {
            break;
         }
      }
 
      /* Return TRUE on success, FALSE on failure */
      return TRUE;
   }

#endif

char * DLL_EXPORT hello(char * user) // // returns a string "Hello USER!";
{
   char * greeting = malloc( strlen(user) + 7); // +Hello!
   sprintf(greeting, "Hello %s!", user);
   return greeting;
}

void DLL_EXPORT helloworld()
{
   printf("Hello World\n");
}

To create a shared library on Linux, we must follow a two step procedure: create a Object File with PIC (Position Independent Code) and then use it to create a Shared Object library (.so).

gcc -c -fPIC dllmain.c -o dllmain.o
gcc -shared -o libhelloworld.so dllmain.o

There's a convention for naming shared object libraries: libNAMEOFYOURLIBRARY.so. It can also carry the library's version number at the end, like libhelloworld.so.1.0.

Okay, our libhelloworld.so is now created. Let's focus about how to use it: by dynamically loading/unloading the library at run time (the way we did in Windows here) or using the dynamic linker to point our library calls towards its shared instance on memory. In the later, whenever we compile our source code, we must link it with all shared object libraries used within our code. Let's see an example of both:

Dynamically load/unload at run-time:

(Source code adapted from the one available at http://linux.die.net/man/3/dlopen)

#include <stdio.h>
#include <stdlib.h>
#include <dlfcn.h>
int main(int argc, char **argv)
{
   void * handle;
   char * (*hello)(char*);
   void * (*helloworld)();
   char * error;

   handle = dlopen("libhelloworld.so", RTLD_LAZY);
   if (!handle)
   {
      fprintf(stderr, "%s\n", dlerror());
      exit(EXIT_FAILURE);
   }

   dlerror(); /* Clear any existing error */

   *(void **) (&hello) = dlsym(handle, "hello");
   *(void **) (&helloworld) = dlsym(handle, "helloworld");

   if ((error = dlerror()) != NULL)
   {
      fprintf(stderr, "%s\n", error);
      exit(EXIT_FAILURE);
   }

   printf("%s\n", (*hello)("carr3r"));
   helloworld();

   dlclose(handle);
   exit(EXIT_SUCCESS);
}

To compile it, pass the parameters -rdynamic and -ldl (dynamic loader library) to GCC:

gcc -rdynamic -o main main.c -ldl

Run it: ./main

Using Shared Object library:

#include <stdio.h> 
#include "dll.h" 
 
int main(int argc, char* argv[])
{
   printf("%s\n", hello("carr3r"));
   helloworld();
   exit(EXIT_SUCCESS); 
}

When compiling it, we must link it to the shared library "helloworld" (libhelloworld.so) that we're using (and eventually all others libraries), so the compiler can record the library routines the program needs to call. Whenever this program is loaded, the dynamic linker is responsible for managing and addressing all procedures references to the their shared-object libraries in memory, respectively.

gcc -o main main.c lhelloworld -L./

We can use the ldd (List Dynamic Dependencies) application to see a list of shared libraries required by a program to run. In our case:

[carrer@localhost MyLib]$ ldd main
linux-gate.so.1 => (0xb77d1000)
libhelloworld.so => not found
libc.so.6 => /lib/libc.so.6 (0xb7600000)
/lib/ld-linux.so.2 (0xb77d2000)

Curiously, our library couldn't be found, even though it is in the same directory we're working on. If we are stubborn and try to run it, it will throw the error "./main: error while loading shared libraries: libhelloworld.so: cannot open shared object file: No such file or directory". That's because shared libraries are made to be shared and the system will lookup for these resources in a few standard locations (such as /lib and /usr/lib). So, if you're using a non-standard location to store you library, then you can:

  • include the library's path to the LD_LIBRARY_PATH environment variable;
    • export LD_LIBRARY_PATH=$LD_LIBRARY_PATH:OUR_LIBRARY_PATH;
  • use ldconfig program or edit /etc/ld.so.conf to add your library's path into the search directories list;
  • move the library into a standard folder, like /usr/lib;


Interesting threads:

Creating and using shared libraries in Linux
Creating Shared Libraries in Linux - Part 2
Static, Shared Dynamic and Loadable Linux Libraries
http://www.tldp.org/HOWTO/Program-Library-HOWTO/shared-libraries.html

Source codes

Creating a 32/64bit Windows DLL with Dev-Cpp and using it from Java

This is something that I suddenly got curious about how is done and tried to do it myself. I messed around with this subject for few hours, tried some approaches that failed at the end and, after all that, I'll try to write down a quick and effective "recipe" for doing so.

First of all, to create a 64bit Windows library we must use a 64bit compiler. Lucky for us, there's a Dev-Cpp package that comes with a 64bit compiler (available here - choose the "The setup which includes TDM-GCC x64 4.8.1"). Paraphrasing the content in this link:

   
Choosing between 32bit and 64bit
   The 64bit compiler will fully work op 32bit systems.
   The 64bit compiler can create 64bit and 32bit executables and DLLs.
   The 64bit compiler currently provides much more headers and libraries.
   The 32bit compiler can only create 32bit executables and DLLs.
undefinedSo, there's no much reason left to use a 32bit compiler anyway.

Okay, let's make our DLL!

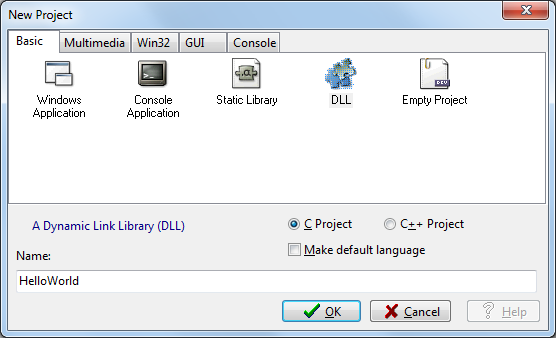
Go to Dev-Cpp and create a new DLL project (C language type), name it "HelloWorld" and save it somewhere in your harddrive. Dev-Cpp will automatically generate two files: a header file (.h) and a main source code file (.c/.cpp depending on which language you've choosen).

I'm not sure why Dev-Cpp generates some DLLIMPORT statements in the code since we're creating a DLL (therefore we would like to produce an API, for instance, not to consume one). Have in mind that DLLEXPORT is used to mark a function as exported from the DLL. DLLIMPORT is the opposite: it marks a function as being imported from a DLL. So let's rewrite our header file to the following:

/* dll.h */
#ifndef __DLL_H__
#define __DLL_H__

#define DLL_EXPORT __declspec(dllexport)

    char * DLL_EXPORT hello(char * user); // returns a string "Hello USER!";
    void DLL_EXPORT helloworld(); //prints out a "Hello World"

#endif // __DLL_H__

In our automatically-generated main source code, there's some trash code followed by a DllMain function. We'll not touch this function. To know more about it's importance and how to use it, check out this thread.

Fill out the source code with these lines:

/* dllmain.c */
#include "dll.h"
#include <windows.h>


char * DLL_EXPORT hello(char * user) // // returns a string "Hello USER!";
{
	char * greeting = malloc( strlen(user) + 7); // + "Hello!" characters
	sprintf(greeting, "Hello %s!", user);
	return greeting;
}

void DLL_EXPORT helloworld()
{
	printf("Hello World\n");
}

BOOL WINAPI DllMain(HINSTANCE hinstDLL,DWORD fdwReason,LPVOID lpvReserved)
{
	switch(fdwReason)
	{
		case DLL_PROCESS_ATTACH:
		{
			break;
		}
		case DLL_PROCESS_DETACH:
		{
			break;
		}
		case DLL_THREAD_ATTACH:
		{
			break;
		}
		case DLL_THREAD_DETACH:
		{
			break;
		}
	}
	
	/* Return TRUE on success, FALSE on failure */
	return TRUE;
}

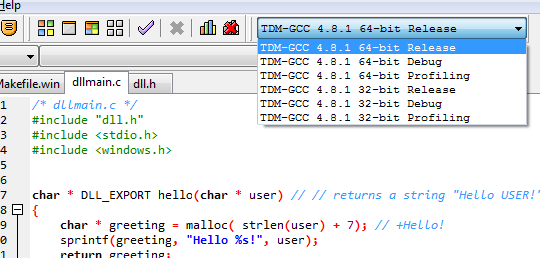
Save all files, then go to "Execute -> Rebuild All". The IDE should have generated our DLL (HelloWorld.dll) in our project's directory path. To compile it on the 64bit compiler, make sure you've chosen right compiler version (TDM-GCC X 64-bit Release) in the dropdown list shown in the toolbar.
undefined

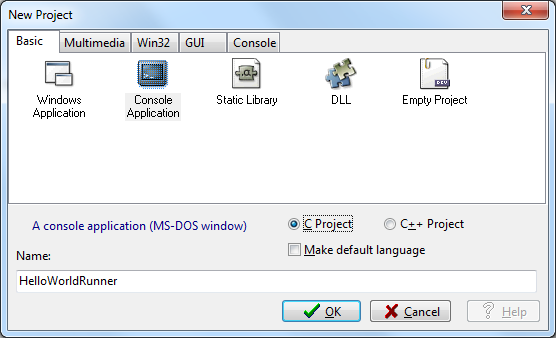
Now let's try to use it. Create a new "Console Application" Project, type C, name it "HelloWorldRunner" and save it into the same directory used for the DLL.
undefined

Dev-Cpp will automatically generate our main function, so let's add some more lines of code to it:

/* main.c */
#include <stdio.h>
#include <windows.h>

typedef char * (*HelloFunction)(char*);
typedef void (*HelloWorldFunction)();

int main(int argc, char *argv[])
{

   HINSTANCE hinstDLL;
   hinstDLL = LoadLibrary("HelloWorld.dll");
 
   if(hinstDLL != 0)
   {
      HelloFunction hello;
      HelloWorldFunction helloworld;
      hello = (HelloFunction) GetProcAddress(hinstDLL, "hello");
      helloworld = (HelloWorldFunction) GetProcAddress(hinstDLL, "helloworld");
 
      printf("%s\n", hello("carr3r"));
      helloworld();
 
      FreeLibrary(hinstDLL);
   }
   else
      printf("It was not possible to load DLL. Error #%d", GetLastError());

   return 0;
}

Save it. Build it. Run it. Don't forget to build this new project with a 64bit compiler, otherwise you won't be able to load the DLL.

undefined

So far, so good. Now comes the "tricky" part: using our brand new DLL in Java. The approach I liked the most was to do it using the Java Native Access (JNA) library and a useful tool called JNAerator. Copied & pasted from Wikipedia: "JNAerator is a computer programming tool for the Java programming language which automatically generates the Java Native Access (JNA) or BridJ code needed to call C and Objective-C libraries from Java code.". Use can get the JNA library here and the JNAerator here.
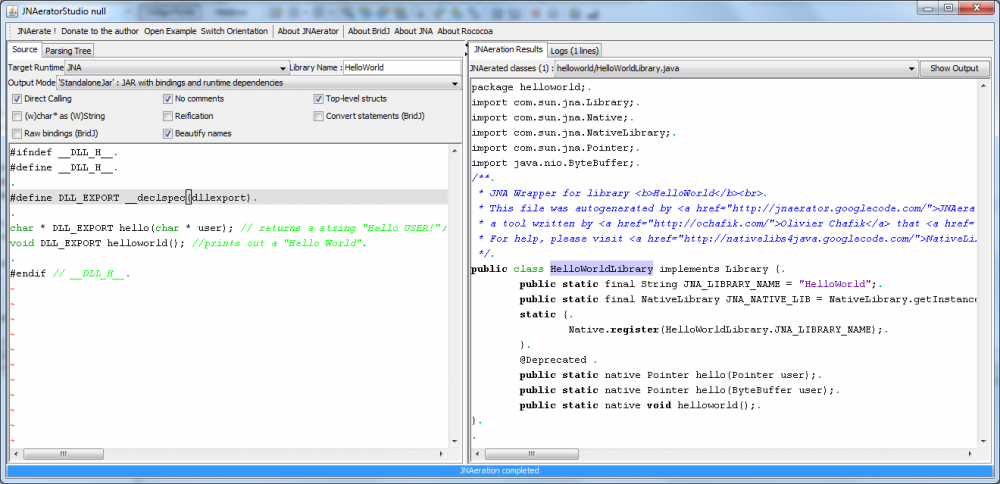
undefinedOn Eclipse or Netbeans, create a new standard Java project. First, add the JNA jar file into to the project's compile-time library list so you'll be able to use it whitin your code. Second, add a new class file, named "HelloWorldLibrary" into the project files. The content of this file will be automatically generated by the JNAerator, that will interpret the C header file of our DLL and create a corelated class for Java (using JNA's classes). Launch the JNAerator (java -jar JNAerator.jar). Copy and paste our DLL header file content into the source textarea, select "JNA" in the "Target Runtime" dropdown listbox, set "HelloWorld" as the "Library Name" and click on the button "Ready to JNAerate". The tool should generate the code below:

/* HelloWorldLibrary.java */
import com.sun.jna.Library;
import com.sun.jna.Native;
import com.sun.jna.NativeLibrary;
import com.sun.jna.Pointer;
import java.nio.ByteBuffer;
/**
 * JNA Wrapper for library <b>HelloWorld</b><br>
 * This file was autogenerated by <a href="http://jnaerator.googlecode.com/">JNAerator</a>,<br>
 * a tool written by <a href="http://ochafik.com/">Olivier Chafik</a> that <a href="http://code.google.com/p/jnaerator/wiki/CreditsAndLicense">uses a few opensource projects.</a>.<br>
 * For help, please visit <a href="http://nativelibs4java.googlecode.com/">NativeLibs4Java</a> , <a href="http://rococoa.dev.java.net/">Rococoa</a>, or <a href="http://jna.dev.java.net/">JNA</a>.
 */
public class HelloWorldLibrary implements Library {
   public static final String JNA_LIBRARY_NAME = "HelloWorld";
   public static final NativeLibrary JNA_NATIVE_LIB = NativeLibrary.getInstance(HelloWorldLibrary.JNA_LIBRARY_NAME);
   static {
      Native.register(HelloWorldLibrary.JNA_LIBRARY_NAME);
   }
   @Deprecated 
   public static native Pointer hello(Pointer user);
   public static native Pointer hello(ByteBuffer user);
   public static native void helloworld();
}

Now copy the generated code and save it into the "HelloWorldLibrary.java" file. Don't forget to place the "HelloWorld.dll" file into your Java project's directory path. To call the library from within your main function, simply use the instructions below:

   ByteBuffer name = ByteBuffer.wrap(("carr3r").getBytes("ASCII"));
   System.out.println( HelloWorldLibrary.hello(name).getString(0) );
   HelloWorldLibrary.helloworld();


All source codes are available here:

Home