Touching Bluetooth with JY-MCU HC-06 V1.06 Wireless Serial Port board
 Many weeks ago I ordered a Bluetooth Module for Arduino, planning to use it for controlling my 16x16 red dot LED display (instead of using IR) and also for collecting data from my Swimming-pool-NFC-stopwatch-counter device, both using my smartphone.
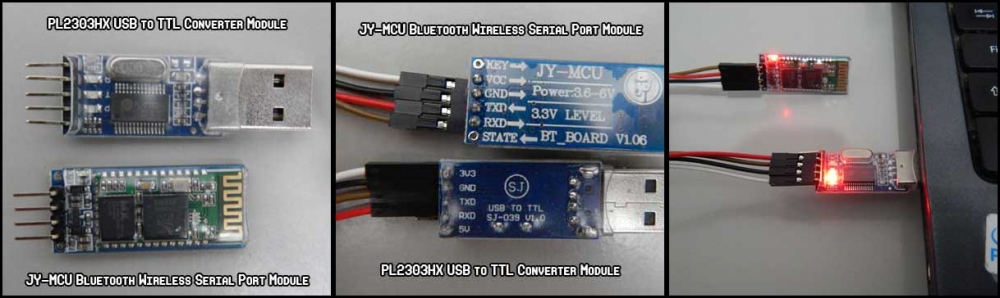
As I'm not good at soldering, I bought an assembled one, that comes attached to an interface board with 4 pins, making it very easy to use. Data transfer is done by Serial communication (UART) using TTL level (0 and 5V), which is fine to work with Arduino (Read "UART – Universal Asynchronous Receiver and Transmitter" and "Microcontroller UART Tutorial" to get familiar with terms like UART, RS232, TTL, etc - before writing this post, I confess I didn't know much about them). As I had an USB to "RS232" TTL converter, I wanted to test the board and set it up using my own computer.
The HC06 is a slave Bluetooth module (read this). That means it can be only connected to a single master and, therefore, can not communicate with other slave devices or anybody else. Its instruction set, for configuration purposes, is very short. We can only setup its baudrate, Bluetooth device name and PIN code, apart from checking its firmware version and connection state.
The table below describes all the AT commands available at the HC06 module ("The AT is an ATTENTION command and is used as a prefix to other parameters in a string. The AT command combined with other parameters can be set up in the communications package or typed in manually as a command line instruction" taken from AT Commands Reference Guide )
| AT Command | Response | Description |
|---|---|---|
| AT | OK | Check connection |
| AT+VERSION | OKlinvorVxxx | Get the firmware's version |
| AT+BAUDx | OKyyyy | Set baudrate. Replace x with: 1 for 1200 bps 2 for 2400 bps 3 for 4800 bps 4 for 9600 bps 5 for 19200 bps 6 for 38400 bps 7 for 57600 bps 8 for 115200 bps 9 for 230400 bps A for 460800 bps B for 921600 bps C for 1382400 bps |
| AT+NAMEString | OKsetname | Change the Bluetooth device name, maximum of 20 characters |
| AT+PINxxxx | OKsetpin | Set the Bluetooth PIN code. |
The table and figure below illustrate the modules wiring diagram. Wire both devices using the following instructions.
| USB to RS232 TTL | JY-MCU V1.06 |
|---|---|
| 3V3 | VCC |
| GND | GND |
| TX | RX |
| RX | TX |
Now, connect the "USB to RS232 TTL" into one of your computer's USB ports, open up a terminal (on Linux) and type:
dmesg
Here's what my Fedora outputs:
[ 4275.425111] usb 3-1: new full-speed USB device number 4 using uhci_hcd
[ 4275.570131] usb 3-1: New USB device found, idVendor=067b, idProduct=2303
[ 4275.570139] usb 3-1: New USB device strings: Mfr=1, Product=2, SerialNumber=0
[ 4275.570144] usb 3-1: Product: USB-Serial Controller
[ 4275.570148] usb 3-1: Manufacturer: Prolific Technology Inc.
[ 4275.575231] pl2303 3-1:1.0: pl2303 converter detected
[ 4275.587677] usb 3-1: pl2303 converter now attached to ttyUSB1
The important part here is to check which interface your system gave/linked to your device. In my case, the interface is /dev/ttyUSB1
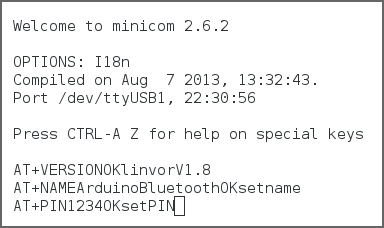
We can use minicom as a Serial console to visually interact (send/receive data) with our Serial devices.
minicom -b 9600 -8 -D /dev/ttyUSB1
As Byron states at his blog, "For this firmware you have to not send LF or CR character at the end of your AT command. AT programming mode is up when your board is not paired by Bluetooth devices. For this firmware, you have to copy/paste AT command since timings is important. You can send about one command per second."
You'll realize you need to copy/paste the AT commands when you try to write any AT command at the console by yourself. It's almost impossible to get it done.
Copy and paste, one line at a time, the following AT commands in order to set up the device to be announced as "ArduinoBluetooth" and to use the PIN code "1234".
AT+NAMEArduinoBluetooth
AT+PIN1234
Done! Your device should have been properly set up if you get something similar to the image below.
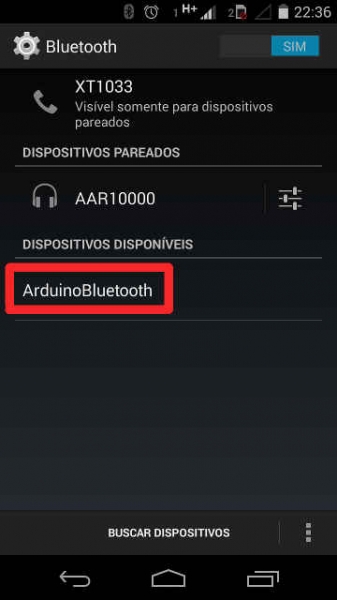
You can use your smart phone or other master Bluetooth device to check the connection parameters.
My next step is to develop a native Android application and try some data exchange over the air through simple Serial consoles (using minicom on my Laptop and building a similar app on Android).