carr3r

Arduino Smart Window Sticker for vehicles - Part 4

As I've had my Smart Window Sticker around my desktop table for programming purposes for so long, it kind of became part of this environment and started to gain functions in it. At first, I implemented few features for testing matters, to validate my drawing functions, transitions effects and so on, but eventually it got really cool functions so I had no choice other than keeping it here. And that's how my Smart Window Sticker got transformed into my... LED matrix taskbar/display/helper/thing/whatever. Through PHP (command line script), I could integrate it with my working station and make it help me on my daily tasks and habits.

It can:

  • alert me whenever a new e-mail message arrives at my inbox;
  • show me the weather conditions and forecast whether it's going or not to rain at 6 o'clock PM (when I usually leave work - as I usually use my motorcycle for going to work, it's nice to know if I can leave earlier in order to avoid the rain) 
  • remind me to take coffee breaks (stop for a bit and rest)
  • inform whenever to have a quick lunch, like a fruit (nutritionists say we shouldn't stay over 3 hours without eating something)
  • make me drink water regularly


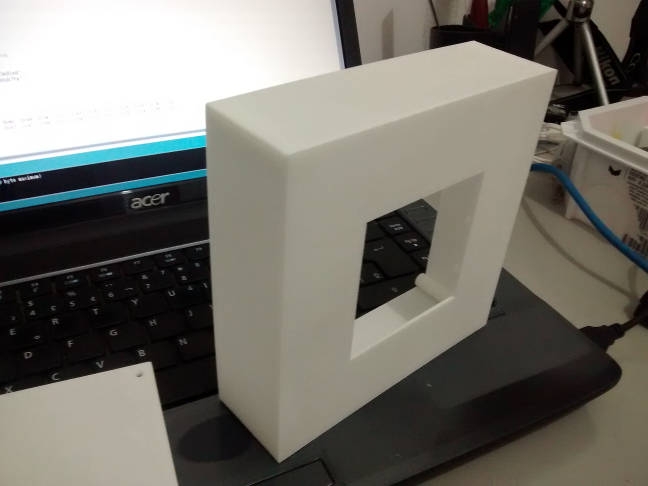
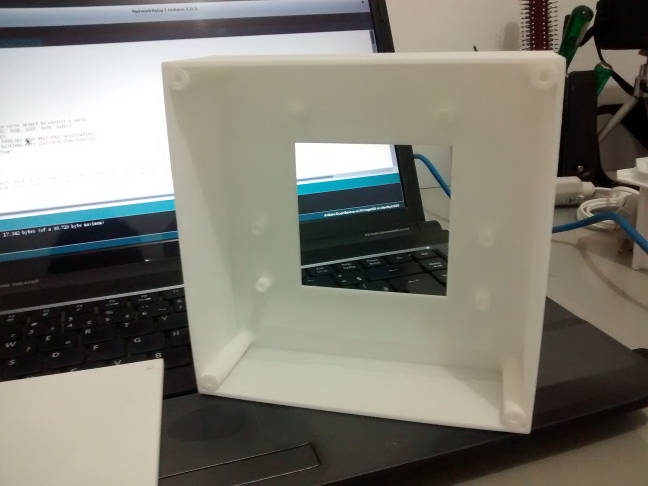
As can be checked at video above, I removed the Infra Red receiver and made a frame-box with a 3D printer for housing the circuits.

undefined

undefinedI chose to paint it black with tint spray. The PHP script makes use of World Weather Online®'s and Forecast.IO's API service for weather forecasting and a PowerShell script for perceiving e-mail reception at Outlook. I intend to create something for showing my football team's position/calendar at the national league and do something related to market interest rates, etc. I did implement a news feed reader, but reading something at it required took too much time/effort and the resulting experience wasn't good enough to keep it.


Source code:

Arduino ( BT ) Android

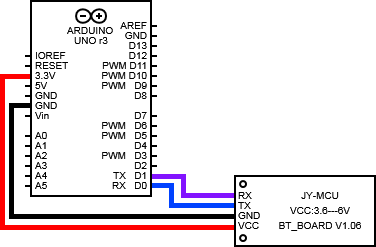
Fundefinedollowing up on my last post, it was time to see some data exchange between my smartphone and Arduino through the Bluetooth module I had just set up. I connected the JY-MCU HC06 V1.06 Bluetooth board to my Arduino respecting the wiring diagram aside.

At first, I thought of creating a simple ping-pong application (where Arduino would reply a "pong" message whenever it receives a "ping" message), but it would be nice to have a way of visually debugging Arduino, since it won't be connected to a terminal (although it could be done connecting the Bluetooth module to Arduino's non-regular TX/RX pins, as Matt Bell did in his blog). So I decided to invert the 13th pin output value (turning on and off its LED) whenever I receive a "ping" message.

#define LED 13
String str;
byte state = 0;

void setup()
{
   pinMode(LED, OUTPUT);
   digitalWrite(LED, LOW);
   Serial.begin(9600);
}

void loop() 
{
   if(Serial.available() > 0)
   {
      str = Serial.readStringUntil('\n');
      if (str.equals("ping"))
      {
         if (state==0)
         {
            digitalWrite(LED, HIGH);
            state = 1;
         }
         else
         {
            digitalWrite(LED, LOW);
            state = 0;
         }
         Serial.write("pong\n");
      }
      else
      {
         Serial.write("ok\n");
      }
   }
}

I used Android Studio for developing the mobile App. It comes with everything you need to code and build apps for Android devices.

I'll just point out the important parts and concepts of my code, instead of explaining it line-by-line. First of all, as our app will use the Bluetooth resource, we must declare it in the App's manifest (so the user can consent and allow the app to do so, at installation time). To simplify things, our application will only list previously paired Bluetooth devices (so we don't need to handle device discovery and pairing processes). Whenever we select a Bluetooth device in the list, the app will try to establish a socket-like connection with it. This connection will be always re-established at the Activity's onResume event and should be always closed at the onPause event ("Release system resources, such as broadcast receivers, handles to sensors (like GPS), or any resources that may affect battery life while your activity is paused and the user does not need them.", from Pausing and Resuming an Activity). Once our socket connection is set, we can read (receive) and write (send) data through it's InputStream and OutputStream. As data reception is "asynchronous" in terms that we do not trigger it, it just happens, we should create a background thread for continuously checking if anything hits the InputStream. Having said that, all code not related to these features is mere decoration.

I'll put the whole Main class code here, but everything is packed up and available to download at the end of this post.

package com.carr3r.arduinobluetooth;

import android.bluetooth.BluetoothAdapter;
import android.bluetooth.BluetoothDevice;
import android.bluetooth.BluetoothSocket;
import android.content.Intent;
import android.os.Build;
import android.os.Bundle;
import android.os.Handler;
import android.support.v7.app.ActionBarActivity;
import android.text.Editable;
import android.util.Log;
import android.view.Menu;
import android.view.MenuItem;
import android.view.View;
import android.widget.AdapterView;
import android.widget.ArrayAdapter;
import android.widget.EditText;
import android.widget.Spinner;
import android.widget.TextView;

import java.io.IOException;
import java.io.InputStream;
import java.io.OutputStream;
import java.lang.reflect.Method;
import java.util.ArrayList;
import java.util.List;
import java.util.Set;
import java.util.UUID;


public class MainActivity extends ActionBarActivity implements AdapterView.OnItemSelectedListener {

    private static final String TAG = "carr3r.arduinobluetooth";

    private BluetoothAdapter btAdapter = null;
    private BluetoothSocket btSocket = null;
    private OutputStream outStream = null;
    private InputStream inStream = null;

    private String MACaddress = null;
    private boolean hasConnected = false;

    private Thread workerThread;
    byte[] readBuffer;
    int readBufferPosition;
    volatile boolean stopWorker;

    // SPP UUID service
    private static final UUID MY_UUID = UUID.fromString("00001101-0000-1000-8000-00805F9B34FB");


    @Override
    protected void onCreate(Bundle savedInstanceState) {
        super.onCreate(savedInstanceState);
        setContentView(R.layout.activity_main);

        btAdapter = BluetoothAdapter.getDefaultAdapter();

        if (btAdapter == null) {
            Log.e(TAG, "Bluetooth not supported");
            add2terminal("Bluetooth not supported");
        } else {
            if (btAdapter.isEnabled()) {

                Log.i(TAG, "Bluetooth is ON");
                add2terminal("Bluetooth is ON");

            } else {
                //Prompt user to turn on Bluetooth
                Log.i(TAG, "Bluetooth is OFF. Switch it on?");
                Intent enableBtIntent = new Intent(BluetoothAdapter.ACTION_REQUEST_ENABLE);
                startActivityForResult(enableBtIntent, 1);
            }
        }
    }

    @Override
    public void onResume() {
        super.onResume();

        if (btAdapter != null) {
            btAdapter.cancelDiscovery();

            Set<BluetoothDevice> pairedDevices = btAdapter.getBondedDevices();
            // If there are paired devices
            if (pairedDevices != null && pairedDevices.size() > 0) {


                List<String> list = new ArrayList<String>();
                list.add("");

                // Loop through paired devices
                for (BluetoothDevice device : pairedDevices) {
                    list.add(device.getName() + " (" + device.getAddress() + ")");
                    Log.i(TAG, "Device found: " + device.getName() + " (" + device.getAddress() + ")");
                }

                ArrayAdapter<String> dataAdapter = new ArrayAdapter<String>(this, android.R.layout.simple_spinner_item, list);
                dataAdapter.setDropDownViewResource(android.R.layout.simple_spinner_dropdown_item);
                final Spinner deviceList = (Spinner) findViewById(R.id.lstBluetoothDevice);
                deviceList.setAdapter(dataAdapter);
                deviceList.setClickable(true);
                deviceList.setOnItemSelectedListener(this);
            }

            if (hasConnected)
                connect2device(MACaddress);
        }

    }

    private void connect2device(String mac) {
        BluetoothDevice device = btAdapter.getRemoteDevice(mac);

        try {

            if (Build.VERSION.SDK_INT >= 10) {
                try {
                    Method m = device.getClass().getMethod("createInsecureRfcommSocketToServiceRecord", new Class[]{UUID.class});
                    btSocket = (BluetoothSocket) m.invoke(device, MY_UUID);
                } catch (Exception e) {
                    Log.e(TAG, e.getMessage());
                }
            } else
                btSocket = device.createRfcommSocketToServiceRecord(MY_UUID);
        } catch (IOException e) {
            Log.e(TAG, e.getMessage());
        }

        if (btSocket != null)
            try {
                btSocket.connect();
            } catch (IOException e1) {
                Log.e(TAG, e1.getMessage());
                try {
                    btSocket.close();
                } catch (IOException e2) {
                    Log.e(TAG, e2.getMessage());
                }
                btSocket = null;
            }

        if (btSocket != null) {
            try {
                outStream = btSocket.getOutputStream();
            } catch (IOException e) {
                Log.e(TAG, e.getMessage());
            }

            try {
                inStream = btSocket.getInputStream();
            } catch (IOException e) {
                Log.e(TAG, e.getMessage());
            }
        }

        if (inStream != null) {
            startListeningThread();
            hasConnected = true;
            MACaddress = mac;

            add2terminal("Connected to " + MACaddress + "!");
        } else {
            hasConnected = false;
            btSocket = null;
            outStream = null;
            inStream = null;

            add2terminal("It was not possible to establish a connection to " + mac);
        }

    }

    void startListeningThread() {
        final Handler handler = new Handler();
        final byte delimiter = 10; //This is the ASCII code for a newline character

        stopWorker = false;
        readBufferPosition = 0;
        readBuffer = new byte[1024];
        workerThread = new Thread(new Runnable() {
            public void run() {
                while (!Thread.currentThread().isInterrupted() && !stopWorker) {
                    try {
                        int bytesAvailable = inStream.available();
                        if (bytesAvailable > 0) {
                            byte[] packetBytes = new byte[bytesAvailable];
                            inStream.read(packetBytes);
                            for (int i = 0; i < bytesAvailable; i++) {
                                byte b = packetBytes[i];
                                if (b == delimiter) {
                                    byte[] encodedBytes = new byte[readBufferPosition];
                                    System.arraycopy(readBuffer, 0, encodedBytes, 0, encodedBytes.length);
                                    final String data = new String(encodedBytes, "US-ASCII");
                                    readBufferPosition = 0;

                                    handler.post(new Runnable() {
                                        public void run() {
                                            add2terminal("< " + data);
                                        }
                                    });
                                } else {
                                    readBuffer[readBufferPosition++] = b;
                                }
                            }
                        }
                    } catch (IOException ex) {
                        stopWorker = true;
                    }
                }
            }
        });

        workerThread.start();
    }

    @Override
    public void onPause() {
        super.onPause();

        if (btAdapter != null) {

            if (outStream != null) {
                try {
                    outStream.close();
                } catch (IOException e) {
                    Log.e(TAG, e.getMessage());
                }
            }

            if (inStream != null) {
                try {
                    inStream.close();
                } catch (IOException e) {
                    Log.e(TAG, e.getMessage());
                }
            }

            if (btSocket != null)
                try {
                    btSocket.close();
                } catch (IOException e) {
                    Log.e(TAG, e.getMessage());
                }

            stopWorker = true;
        }
    }

    private void sendData(String message) {

        if (outStream != null) {
            byte[] msgBuffer = message.getBytes();
            try {
                outStream.write(msgBuffer);
            } catch (IOException e) {
                Log.e(TAG, e.getMessage());
            }
        }
    }

    @Override
    public boolean onCreateOptionsMenu(Menu menu) {

        // Inflate the menu; this adds items to the action bar if it is present.
        getMenuInflater().inflate(R.menu.main, menu);
        return true;
    }

    @Override
    public boolean onOptionsItemSelected(MenuItem item) {
        // Handle action bar item clicks here. The action bar will
        // automatically handle clicks on the Home/Up button, so long
        // as you specify a parent activity in AndroidManifest.xml.
        int id = item.getItemId();
        return id == R.id.action_settings ? true : super.onOptionsItemSelected(item);
    }

    public void add2terminal(String message) {
        TextView term = (TextView) findViewById(R.id.edtTerminal);
        term.append(message + "\n");
    }

    @Override
    public void onItemSelected(AdapterView<?> adapterView, View view, int i, long l) {
        String device = ((Spinner) findViewById(R.id.lstBluetoothDevice)).getSelectedItem().toString();
        if (device.length() > 0) {
            String selectedMac = device.substring(device.indexOf(" (") + 2).replace(")", "");
            add2terminal("Trying to connect to " + selectedMac);
            connect2device(selectedMac);
        }
    }

    @Override
    public void onNothingSelected(AdapterView<?> adapterView) {

    }

    public void onBtnSendClick(View v) {
        EditText edit = (EditText) findViewById(R.id.edtSend);
        Editable text = edit.getText();
        if (text != null && text.length() > 0) {
            sendData(text.toString() + "\n");
            add2terminal("> " + text.toString());
            text.clear();
        }
    }
} 

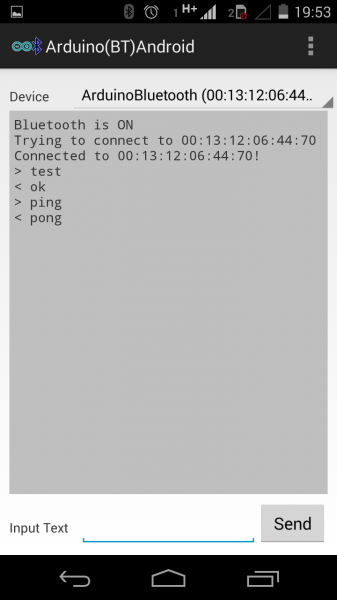
A screenshot of the app running is shown below. At least in my MotoG, it works like a charm.


undefined


Source code:

Touching Bluetooth with JY-MCU HC-06 V1.06 Wireless Serial Port board

undefinedMany weeks ago I ordered a Bluetooth Module for Arduino, planning to use it for controlling my 16x16 red dot LED display (instead of using IR) and also for collecting data from my Swimming-pool-NFC-stopwatch-counter device, both using my smartphone.

As I'm not good at soldering, I bought an assembled one, that comes attached to an interface board with 4 pins, making it very easy to use. Data transfer is done by Serial communication (UART) using TTL level (0 and 5V), which is fine to work with Arduino (Read "UART – Universal Asynchronous Receiver and Transmitter" and "Microcontroller UART Tutorial" to get familiar with terms like UART, RS232, TTL, etc - before writing this post, I confess I didn't know much about them). As I had an USB to "RS232" TTL converter, I wanted to test the board and set it up using my own computer.

The HC06 is a slave Bluetooth module (read this). That means it can be only connected to a single master and, therefore, can not communicate with other slave devices or anybody else. Its instruction set, for configuration purposes, is very short. We can only setup its baudrate, Bluetooth device name and PIN code, apart from checking its firmware version and connection state.

The table below describes all the AT commands available at the HC06 module ("The AT is an ATTENTION command and is used as a prefix to other parameters in a string. The AT command combined with other parameters can be set up in the communications package or typed in manually as a command line instruction" taken from AT Commands Reference Guide )

AT Commands Set 
AT CommandResponseDescription
AT OK Check connection
AT+VERSION OKlinvorVxxx Get the firmware's version
AT+BAUDx OKyyyy Set baudrate. Replace x with:
1 for 1200 bps
2 for 2400 bps
3 for 4800 bps
4 for 9600 bps
5 for 19200 bps
6 for 38400 bps
7 for 57600 bps
8 for 115200 bps
9 for 230400 bps
A for 460800 bps
B for 921600 bps
C for 1382400 bps
AT+NAMEString OKsetname Change the Bluetooth device name, maximum of 20 characters
AT+PINxxxx OKsetpin Set the Bluetooth PIN code.

The table and figure below illustrate the modules wiring diagram. Wire both devices using the following instructions.

Pinout diagram
USB to RS232 TTLJY-MCU V1.06
3V3 VCC 
GND GND 
TX RX 
RX  TX

undefined

Now, connect the "USB to RS232 TTL" into one of your computer's USB ports, open up a terminal (on Linux) and type:

dmesg

Here's what my Fedora outputs:

[ 4275.425111] usb 3-1: new full-speed USB device number 4 using uhci_hcd
[ 4275.570131] usb 3-1: New USB device found, idVendor=067b, idProduct=2303
[ 4275.570139] usb 3-1: New USB device strings: Mfr=1, Product=2, SerialNumber=0
[ 4275.570144] usb 3-1: Product: USB-Serial Controller
[ 4275.570148] usb 3-1: Manufacturer: Prolific Technology Inc.
[ 4275.575231] pl2303 3-1:1.0: pl2303 converter detected
[ 4275.587677] usb 3-1: pl2303 converter now attached to ttyUSB1

The important part here is to check which interface your system gave/linked to your device. In my case, the interface is /dev/ttyUSB1

We can use minicom as a Serial console to visually interact (send/receive data) with our Serial devices.

minicom -b 9600 -8 -D /dev/ttyUSB1

As Byron states at his blog, "For this firmware you have to not send LF or CR character at the end of your AT command. AT programming mode is up when your board is not paired by Bluetooth devices. For this firmware, you have to copy/paste AT command since timings is important. You can send about one command per second."

You'll realize you need to copy/paste the AT commands when you try to write any AT command at the console by yourself. It's almost impossible to get it done.

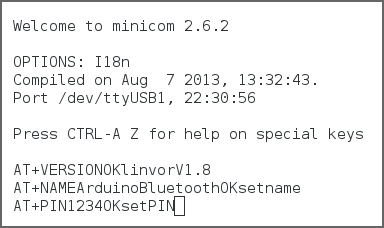
Copy and paste, one line at a time, the following AT commands in order to set up the device to be announced as "ArduinoBluetooth" and to use the PIN code "1234".

AT+NAMEArduinoBluetooth
AT+PIN1234

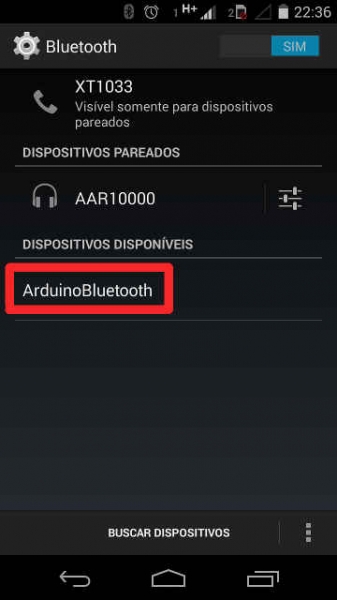
Done! Your device should have been properly set up if you get something similar to the image below.

undefinedundefined

You can use your smart phone or other master Bluetooth device to check the connection parameters.

My next step is to develop a native Android application and try some data exchange over the air through simple Serial consoles (using minicom on my Laptop and building a similar app on Android).

Arduino Laser Spirograph

I believe I always wanted to build something with lasers, mainly because lasers are cool. It's like playing with fire: it's dangerous, but fun. As a kid, I had a stamp collection and won a magnifying glass to see and analyze my stamps. I think I only used it for putting things on fire.

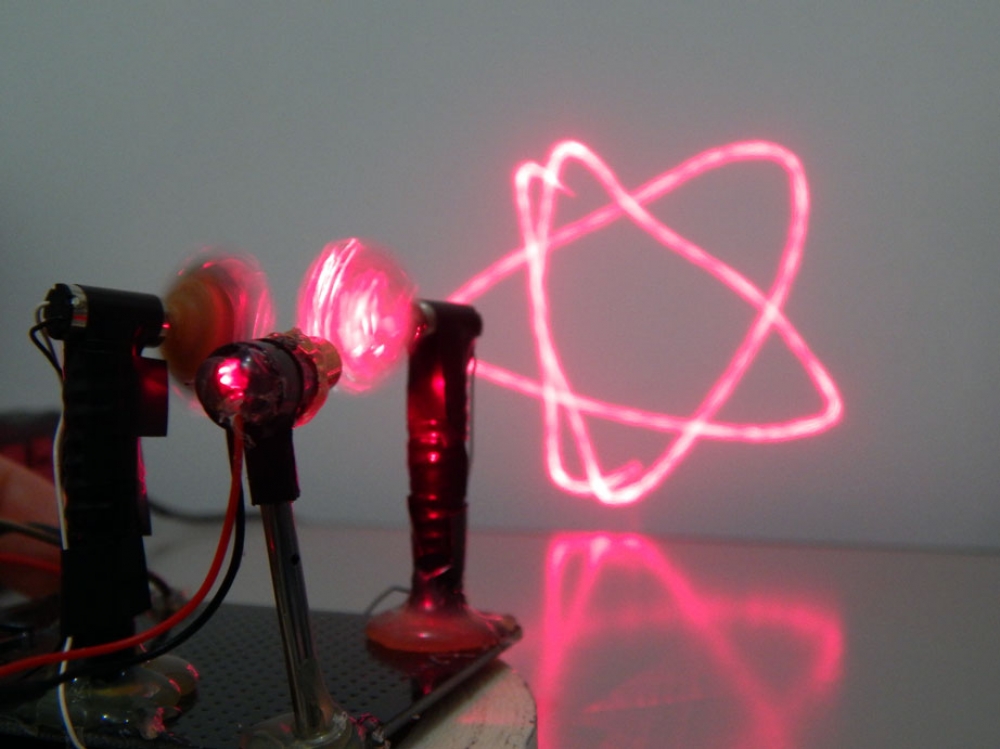
Fundefinedew days ago I saw some cool projects (this one uses laser to put things on fire as well) using lasers and I got tempted to do something as well, since I already had a red laser diode in hands. When I realized how the laser Spirograph worked, I knew it would require very few components to build it and I also found the whole idea behind it very interesting (this illustration made by the Interactive Electronics Design is very explanatory). I'm not talking about the Spirograph itself, but the persistence of vision phenomenon, which allows us to draw things/lines/curves using a single dot of light and see it in a continuous form.

"The essence of the mini-laser Spirograph is two mirrors attached to small dc motors. A laser beam striking the rotating mirrors will produce a wide array of patterns. With one mirror rotating, the reflected beam “paints” an ellipse on a screen. When both mirrors are spinning, two elliptical patterns superimpose to produce more complex shapes. The pattern observed depends on the ratio of the speeds and direction of rotation of the mirrors." - as well stated by Chris Chiaverina here.

A friend of mine gave me a broken remote-controlled helicopter, from which I removed all (5!) DC motors (they are just like this). They don't have much torque, but they're very, very fast and very, very small.

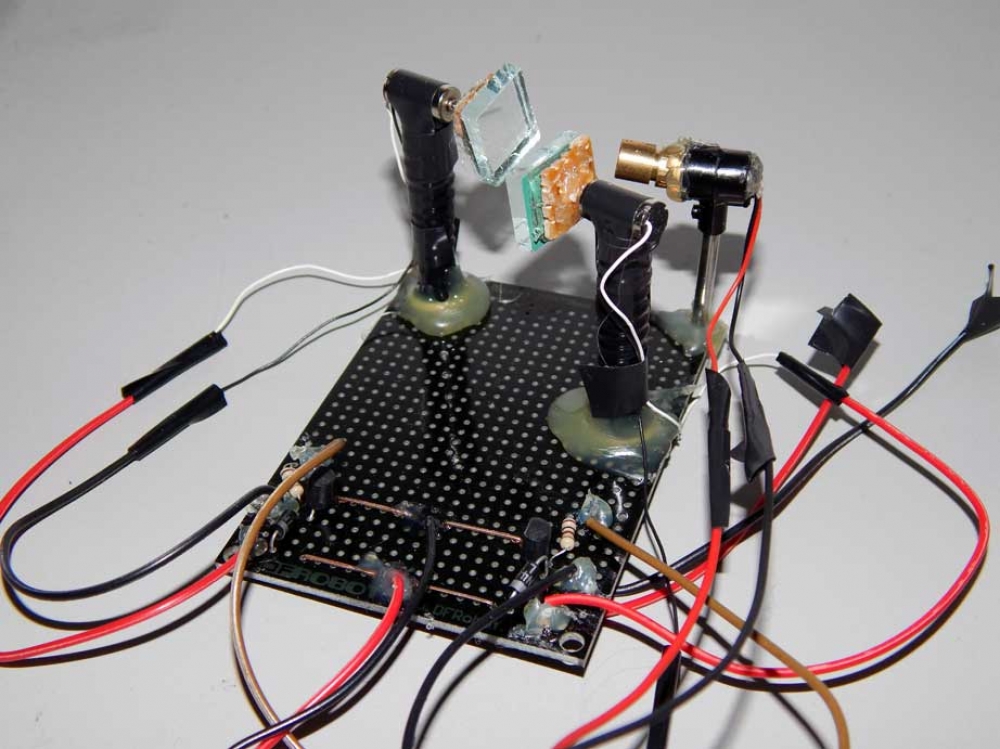
People seem to always use potentiometers to control motor speed, but I wanted my Arduino to do all the job. So I started worrying about controlling a motor speed through the Arduino. I could had used a motor driver to do so, but I found an interesting article at Adafruit that described an inexpensive circuit to control it. So, following the tutorial, I built the circuit, tested it and approved it. Then I transferred the circuit into a PCB protoboard, duplicating it for controlling two motors instead.

I think the most difficult part of assembling the components was to adjust the mirrors in a way they would reflect the laser's projections properly. This was done using a trial and error approach. I used hot glue to fix cables and holders.


undefined

The schematic/wiring diagram is as shown below. Some people will notice upfront that the diagram is a little bit messed up. I was reluctant to publish a post with a "problematic" diagram, but since it is how it was truly done and I intent to improve it, I think it's okay. The problem is that, as I'm using the speed-controlling circuits in parallel under the same power supply (Arduino's 3.3V power pin), whenever I let too much current passes through one circuit, it drains out the current available to the other one, eventually collapsing Arduino, making it reboot. I know, terrible, but it can be easily fixed by adding a separated power supplier (probably I'll make another post whenever I get it done). After few tests I found out that, as far as I use speed values below 90 for both motors, it works fine the way it is now. 

undefined


Demo video:

Be aware of the potential hazards when working with lasers. Read this.

Compiling our library project on Linux

Going further on my research about creating a Windows 64bit library, I wondered how I could bring it into a Linux environment. I knew some modifications would be required (since there's no "windows" library on Linux, for instance, and there's no need for the DllMain function to exist) but I wanted to know what exactly should change.

First of all, going a little bit deeper on the libraries' subject, there's something that is worth mentioning. As Wikipedia states, "a library is a collection of implementations of behavior, written in terms of a language, that has a well-defined interface by which the behavior is invoked". There're two types of libraries: static and dynamic ones. Static libraries (*.lib in Windows/*.a in Linux) are "merged"/copied into a target application and becomes part of it. Dynamic libraries (*.dll in Windows/*.so in Linux) don't. They can be dynamically loaded/unloaded, shared and versioned (there is an interesting discussion about pros 'n cons here). A program that makes use a dynamic library can achieve that by being linked to one or more libraries at compile time (and all the linking work is done by a dynamic linker) or can dynamically load/unload this library at run-time (and everything has to be done "manually", as we did to use our DLL in Windows).

Coming back to our original code, following the suggestion found here, we can adjust our code by segregating OS' specific codes, identifying the compiler being used in compile time.

/* dll.h */
#ifndef __DLL_H__
#define __DLL_H__

#if defined(_MSC_VER) // Microsoft 
   #define DLL_EXPORT __declspec(dllexport)
   #define DLL_IMPORT __declspec(dllimport)
#elif defined(_GCC)   // GCC
   #define DLL_EXPORT __attribute__((visibility("default")))
   #define DLL_IMPORT
#else                 // do nothing and hope for the best?
   #define DLL_EXPORT
   #define DLL_IMPORT
   #pragma warning Unknown dynamic link import/export semantics.
#endif

char * DLL_EXPORT hello(char * user); // returns a string "Hello USER!";
void DLL_EXPORT helloworld(); //prints out a "Hello World"

#endif // __DLL_H__


/* dllmain.c */
#include "dll.h"
#include <stdio.h>

#if defined(_MSC_VER)

   #include <windows.h>
   BOOL WINAPI DllMain(HINSTANCE hinstDLL,DWORD fdwReason,LPVOID lpvReserved)
   {
      switch(fdwReason)
      {
         case DLL_PROCESS_ATTACH:
         {
            break;
         }
         case DLL_PROCESS_DETACH:
         {
            break;
         }
         case DLL_THREAD_ATTACH:
         {
            break;
         }
         case DLL_THREAD_DETACH:
         {
            break;
         }
      }
 
      /* Return TRUE on success, FALSE on failure */
      return TRUE;
   }

#endif

char * DLL_EXPORT hello(char * user) // // returns a string "Hello USER!";
{
   char * greeting = malloc( strlen(user) + 7); // +Hello!
   sprintf(greeting, "Hello %s!", user);
   return greeting;
}

void DLL_EXPORT helloworld()
{
   printf("Hello World\n");
}

To create a shared library on Linux, we must follow a two step procedure: create a Object File with PIC (Position Independent Code) and then use it to create a Shared Object library (.so).

gcc -c -fPIC dllmain.c -o dllmain.o
gcc -shared -o libhelloworld.so dllmain.o

There's a convention for naming shared object libraries: libNAMEOFYOURLIBRARY.so. It can also carry the library's version number at the end, like libhelloworld.so.1.0.

Okay, our libhelloworld.so is now created. Let's focus about how to use it: by dynamically loading/unloading the library at run time (the way we did in Windows here) or using the dynamic linker to point our library calls towards its shared instance on memory. In the later, whenever we compile our source code, we must link it with all shared object libraries used within our code. Let's see an example of both:

Dynamically load/unload at run-time:

(Source code adapted from the one available at http://linux.die.net/man/3/dlopen)

#include <stdio.h>
#include <stdlib.h>
#include <dlfcn.h>
int main(int argc, char **argv)
{
   void * handle;
   char * (*hello)(char*);
   void * (*helloworld)();
   char * error;

   handle = dlopen("libhelloworld.so", RTLD_LAZY);
   if (!handle)
   {
      fprintf(stderr, "%s\n", dlerror());
      exit(EXIT_FAILURE);
   }

   dlerror(); /* Clear any existing error */

   *(void **) (&hello) = dlsym(handle, "hello");
   *(void **) (&helloworld) = dlsym(handle, "helloworld");

   if ((error = dlerror()) != NULL)
   {
      fprintf(stderr, "%s\n", error);
      exit(EXIT_FAILURE);
   }

   printf("%s\n", (*hello)("carr3r"));
   helloworld();

   dlclose(handle);
   exit(EXIT_SUCCESS);
}

To compile it, pass the parameters -rdynamic and -ldl (dynamic loader library) to GCC:

gcc -rdynamic -o main main.c -ldl

Run it: ./main

Using Shared Object library:

#include <stdio.h> 
#include "dll.h" 
 
int main(int argc, char* argv[])
{
   printf("%s\n", hello("carr3r"));
   helloworld();
   exit(EXIT_SUCCESS); 
}

When compiling it, we must link it to the shared library "helloworld" (libhelloworld.so) that we're using (and eventually all others libraries), so the compiler can record the library routines the program needs to call. Whenever this program is loaded, the dynamic linker is responsible for managing and addressing all procedures references to the their shared-object libraries in memory, respectively.

gcc -o main main.c lhelloworld -L./

We can use the ldd (List Dynamic Dependencies) application to see a list of shared libraries required by a program to run. In our case:

[carrer@localhost MyLib]$ ldd main
linux-gate.so.1 => (0xb77d1000)
libhelloworld.so => not found
libc.so.6 => /lib/libc.so.6 (0xb7600000)
/lib/ld-linux.so.2 (0xb77d2000)

Curiously, our library couldn't be found, even though it is in the same directory we're working on. If we are stubborn and try to run it, it will throw the error "./main: error while loading shared libraries: libhelloworld.so: cannot open shared object file: No such file or directory". That's because shared libraries are made to be shared and the system will lookup for these resources in a few standard locations (such as /lib and /usr/lib). So, if you're using a non-standard location to store you library, then you can:

  • include the library's path to the LD_LIBRARY_PATH environment variable;
    • export LD_LIBRARY_PATH=$LD_LIBRARY_PATH:OUR_LIBRARY_PATH;
  • use ldconfig program or edit /etc/ld.so.conf to add your library's path into the search directories list;
  • move the library into a standard folder, like /usr/lib;


Interesting threads:

Creating and using shared libraries in Linux
Creating Shared Libraries in Linux - Part 2
Static, Shared Dynamic and Loadable Linux Libraries
http://www.tldp.org/HOWTO/Program-Library-HOWTO/shared-libraries.html

Source codes

Creating a 32/64bit Windows DLL with Dev-Cpp and using it from Java

This is something that I suddenly got curious about how is done and tried to do it myself. I messed around with this subject for few hours, tried some approaches that failed at the end and, after all that, I'll try to write down a quick and effective "recipe" for doing so.

First of all, to create a 64bit Windows library we must use a 64bit compiler. Lucky for us, there's a Dev-Cpp package that comes with a 64bit compiler (available here - choose the "The setup which includes TDM-GCC x64 4.8.1"). Paraphrasing the content in this link:

   
Choosing between 32bit and 64bit
   The 64bit compiler will fully work op 32bit systems.
   The 64bit compiler can create 64bit and 32bit executables and DLLs.
   The 64bit compiler currently provides much more headers and libraries.
   The 32bit compiler can only create 32bit executables and DLLs.
undefinedSo, there's no much reason left to use a 32bit compiler anyway.

Okay, let's make our DLL!

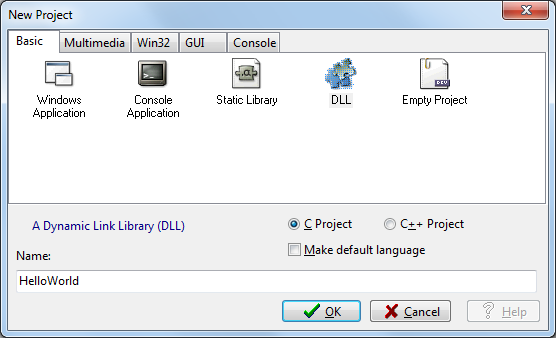
Go to Dev-Cpp and create a new DLL project (C language type), name it "HelloWorld" and save it somewhere in your harddrive. Dev-Cpp will automatically generate two files: a header file (.h) and a main source code file (.c/.cpp depending on which language you've choosen).

I'm not sure why Dev-Cpp generates some DLLIMPORT statements in the code since we're creating a DLL (therefore we would like to produce an API, for instance, not to consume one). Have in mind that DLLEXPORT is used to mark a function as exported from the DLL. DLLIMPORT is the opposite: it marks a function as being imported from a DLL. So let's rewrite our header file to the following:

/* dll.h */
#ifndef __DLL_H__
#define __DLL_H__

#define DLL_EXPORT __declspec(dllexport)

    char * DLL_EXPORT hello(char * user); // returns a string "Hello USER!";
    void DLL_EXPORT helloworld(); //prints out a "Hello World"

#endif // __DLL_H__

In our automatically-generated main source code, there's some trash code followed by a DllMain function. We'll not touch this function. To know more about it's importance and how to use it, check out this thread.

Fill out the source code with these lines:

/* dllmain.c */
#include "dll.h"
#include <windows.h>


char * DLL_EXPORT hello(char * user) // // returns a string "Hello USER!";
{
	char * greeting = malloc( strlen(user) + 7); // + "Hello!" characters
	sprintf(greeting, "Hello %s!", user);
	return greeting;
}

void DLL_EXPORT helloworld()
{
	printf("Hello World\n");
}

BOOL WINAPI DllMain(HINSTANCE hinstDLL,DWORD fdwReason,LPVOID lpvReserved)
{
	switch(fdwReason)
	{
		case DLL_PROCESS_ATTACH:
		{
			break;
		}
		case DLL_PROCESS_DETACH:
		{
			break;
		}
		case DLL_THREAD_ATTACH:
		{
			break;
		}
		case DLL_THREAD_DETACH:
		{
			break;
		}
	}
	
	/* Return TRUE on success, FALSE on failure */
	return TRUE;
}

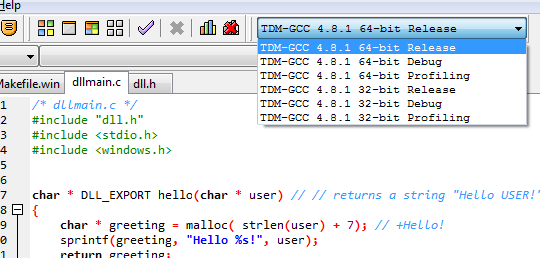
Save all files, then go to "Execute -> Rebuild All". The IDE should have generated our DLL (HelloWorld.dll) in our project's directory path. To compile it on the 64bit compiler, make sure you've chosen right compiler version (TDM-GCC X 64-bit Release) in the dropdown list shown in the toolbar.
undefined

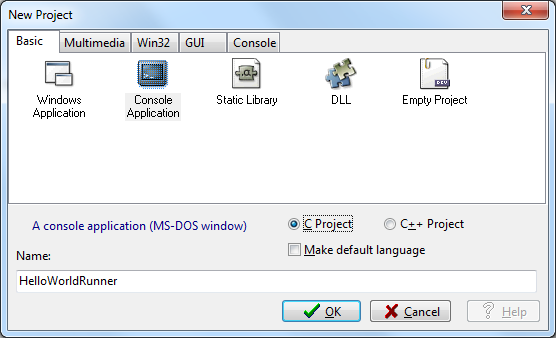
Now let's try to use it. Create a new "Console Application" Project, type C, name it "HelloWorldRunner" and save it into the same directory used for the DLL.
undefined

Dev-Cpp will automatically generate our main function, so let's add some more lines of code to it:

/* main.c */
#include <stdio.h>
#include <windows.h>

typedef char * (*HelloFunction)(char*);
typedef void (*HelloWorldFunction)();

int main(int argc, char *argv[])
{

   HINSTANCE hinstDLL;
   hinstDLL = LoadLibrary("HelloWorld.dll");
 
   if(hinstDLL != 0)
   {
      HelloFunction hello;
      HelloWorldFunction helloworld;
      hello = (HelloFunction) GetProcAddress(hinstDLL, "hello");
      helloworld = (HelloWorldFunction) GetProcAddress(hinstDLL, "helloworld");
 
      printf("%s\n", hello("carr3r"));
      helloworld();
 
      FreeLibrary(hinstDLL);
   }
   else
      printf("It was not possible to load DLL. Error #%d", GetLastError());

   return 0;
}

Save it. Build it. Run it. Don't forget to build this new project with a 64bit compiler, otherwise you won't be able to load the DLL.

undefined

So far, so good. Now comes the "tricky" part: using our brand new DLL in Java. The approach I liked the most was to do it using the Java Native Access (JNA) library and a useful tool called JNAerator. Copied & pasted from Wikipedia: "JNAerator is a computer programming tool for the Java programming language which automatically generates the Java Native Access (JNA) or BridJ code needed to call C and Objective-C libraries from Java code.". Use can get the JNA library here and the JNAerator here.
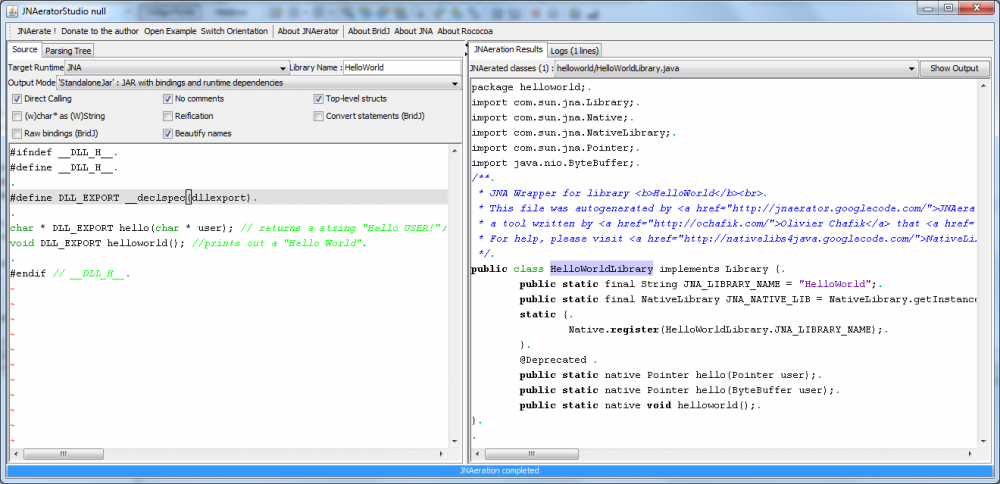
undefinedOn Eclipse or Netbeans, create a new standard Java project. First, add the JNA jar file into to the project's compile-time library list so you'll be able to use it whitin your code. Second, add a new class file, named "HelloWorldLibrary" into the project files. The content of this file will be automatically generated by the JNAerator, that will interpret the C header file of our DLL and create a corelated class for Java (using JNA's classes). Launch the JNAerator (java -jar JNAerator.jar). Copy and paste our DLL header file content into the source textarea, select "JNA" in the "Target Runtime" dropdown listbox, set "HelloWorld" as the "Library Name" and click on the button "Ready to JNAerate". The tool should generate the code below:

/* HelloWorldLibrary.java */
import com.sun.jna.Library;
import com.sun.jna.Native;
import com.sun.jna.NativeLibrary;
import com.sun.jna.Pointer;
import java.nio.ByteBuffer;
/**
 * JNA Wrapper for library <b>HelloWorld</b><br>
 * This file was autogenerated by <a href="http://jnaerator.googlecode.com/">JNAerator</a>,<br>
 * a tool written by <a href="http://ochafik.com/">Olivier Chafik</a> that <a href="http://code.google.com/p/jnaerator/wiki/CreditsAndLicense">uses a few opensource projects.</a>.<br>
 * For help, please visit <a href="http://nativelibs4java.googlecode.com/">NativeLibs4Java</a> , <a href="http://rococoa.dev.java.net/">Rococoa</a>, or <a href="http://jna.dev.java.net/">JNA</a>.
 */
public class HelloWorldLibrary implements Library {
   public static final String JNA_LIBRARY_NAME = "HelloWorld";
   public static final NativeLibrary JNA_NATIVE_LIB = NativeLibrary.getInstance(HelloWorldLibrary.JNA_LIBRARY_NAME);
   static {
      Native.register(HelloWorldLibrary.JNA_LIBRARY_NAME);
   }
   @Deprecated 
   public static native Pointer hello(Pointer user);
   public static native Pointer hello(ByteBuffer user);
   public static native void helloworld();
}

Now copy the generated code and save it into the "HelloWorldLibrary.java" file. Don't forget to place the "HelloWorld.dll" file into your Java project's directory path. To call the library from within your main function, simply use the instructions below:

   ByteBuffer name = ByteBuffer.wrap(("carr3r").getBytes("ASCII"));
   System.out.println( HelloWorldLibrary.hello(name).getString(0) );
   HelloWorldLibrary.helloworld();


All source codes are available here:
Newer posts → Home ← Older posts